 Eng
Eng  中文简体
中文简体
Trailer Brake Shoe: Keep Your Trailer Stopping Safe on the Road
 2026.04.29
 Industry News
Content
Understanding Trailer Brake Shoes and How They Work
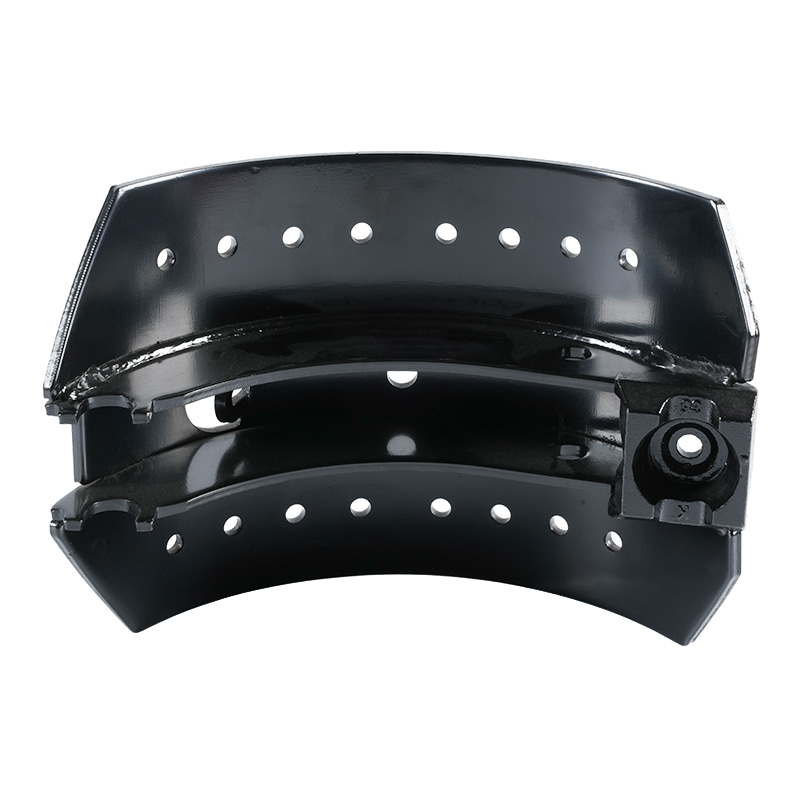
A trailer brake shoe is the curved friction component inside a drum brake assembly that presses against the rotating brake drum to slow or stop your trailer. When you activate your tow vehicle's brake controller, an electrical signal or hydraulic pressure moves the brake shoes outward, creating friction that converts the trailer's momentum into heat. This simple but critical process requires trailer brake shoes engineered to handle repeated stress, moisture exposure, and varying load conditions without fading or failing. Whether you're towing a boat trailer, utility trailer, or heavy equipment hauler, understanding how drum brake shoes for trailers function helps you maintain safer stopping distances and avoid roadside emergencies.
Most replacement trailer brake components use a dual-shoe design with a primary shoe that leads the drum rotation and a secondary shoe that follows. The primary shoe typically handles more friction and wears faster, while the secondary shoe provides additional stopping power and stability. Electric trailer brake shoes are activated by an electromagnet that pulls an actuator arm, while hydraulic systems use wheel cylinder pressure to push the shoes apart. Knowing which system your trailer uses is essential when selecting the correct trailer brake lining and hardware for replacement.
Types of Trailer Brake Shoes and Their Best Uses
Choosing the right utility trailer brake assemblies depends on your towing environment, load weight, and brake system type. Standard organic linings work well for light-duty applications like small cargo trailers or weekend boat hauling, offering quiet operation and gentle drum wear. For heavier loads or frequent mountain driving, semi-metallic or ceramic-based trailer brake lining provides better heat dissipation and fade resistance. Saltwater exposure demands corrosion-resistant hardware and linings formulated to resist moisture degradation, making marine-grade boat trailer brake shoes a smart investment for coastal users.
Material and System Comparison Guide
| Brake Shoe Type | Best For | Heat Resistance | Wet Performance | Service Life |
| Organic Lining | Light cargo, occasional use | Moderate | Fair | Standard |
| Semi-Metallic | Heavy loads, hilly terrain | High | Good | Extended |
| Marine-Grade | Boat trailers, coastal towing | Moderate-High | Excellent | Extended |
| Ceramic Composite | High-mileage, frequent towing | Very High | Good | Maximum |
Beyond friction material, verify compatibility between your trailer brake shoe and the existing brake assembly. Check the axle rating, drum diameter, and mounting hole pattern before ordering replacements. Many manufacturers label shoes with part numbers that correspond to specific axle brands like Dexter, Al-Ko, or Lippert. Taking a photo of your old brake shoes and measuring the lining width and radius can prevent ordering errors that delay your towing plans.
Warning Signs Your Trailer Brake Shoes Need Replacement
Recognizing early symptoms of worn electric trailer brake shoes helps you avoid unsafe towing conditions and costly drum damage. The most common indicator is reduced braking power: if your trailer pushes the tow vehicle during stops or requires excessive brake controller gain to slow down, the linings may be too thin to generate adequate friction. Unusual noises like grinding, scraping, or metallic squealing during brake application often mean the friction material has worn through to the metal backing plate. Visual inspection through the drum access hole can confirm lining thickness; most drum brake shoes for trailers should be replaced when material depth falls below 1/8 inch to maintain safe stopping margins.
Quick Inspection Checklist
- Measure lining thickness at the thinnest point; replace shoes if material is less than 1/8 inch thick or shows cracks, chips, or separation
- Check for oil, grease, or brake fluid contamination on the lining surface, which can cause glazing and dramatically reduce friction
- Inspect the shoe web for bends, rust, or worn contact points at the anchor pin and actuator arm that could affect brake geometry
- Verify that return springs and hold-down hardware are intact and not stretched, corroded, or missing
- Look for uneven wear patterns that may indicate misaligned drums, worn wheel bearings, or improper brake adjustment
Step-by-Step Guide to Replacing Trailer Brake Shoes
Replacing trailer brake lining is a manageable DIY task with the right tools and preparation. Start by safely jacking up the trailer and removing the wheel, then take off the brake drum. If the drum is stuck, gently tap around the edge with a rubber mallet or use the adjustment hole to back off the shoes. Before removing old components, take photos or sketch the arrangement of springs, pins, and actuators to simplify reassembly. Clean the backing plate thoroughly with brake cleaner to remove dust, rust, and old grease that could interfere with new shoe movement.
Installation Best Practices
- Always replace brake shoes in axle sets (both sides) to maintain balanced braking force and prevent trailer sway during stops
- Lubricate anchor pins, actuator contact points, and adjuster threads with high-temperature brake grease; avoid getting grease on the friction lining
- Install new return springs and hold-down hardware with the old set, as metal fatigue can cause premature failure of reused components
- After assembly, adjust the shoes so the drum rotates with slight drag, then test the brakes at low speed in a safe area before highway towing
- Retorque wheel lug nuts after the first 25-50 miles of operation, as brake service can affect hub alignment and fastener tension
Maintenance Tips to Extend Brake Shoe Life
Proactive maintenance significantly extends the service life of your replacement trailer brake components. After each trip in wet or salty conditions, rinse the brake assemblies with fresh water to remove corrosive deposits that can accelerate rust and binding. Periodically check and adjust manual slack adjusters to maintain proper shoe-to-drum clearance; excessive clearance reduces braking efficiency and increases wear on both shoes and drums. For electric brake systems, test the brake controller output and magnet strength annually to ensure consistent activation force across all wheels.
Seasonal Maintenance Reminders
- Before spring towing season, inspect all brake shoes, springs, and hardware for winter corrosion or damage from road salt exposure
- After summer highway trips, check for heat-related glazing on linings and verify drum runout hasn't increased from thermal stress
- Store trailers with brakes applied or use wheel chocks to prevent shoes from sticking to drums during long-term parking
- Keep a spare set of trailer brake shoes and essential hardware in your towing kit for emergency roadside repairs
- Document brake service dates, mileage, and part numbers to support warranty claims and predict future replacement needs


Copyright © Zhejiang Langrun Auto Parts Co., Ltd. All rights reserved. Heavy-Duty Brake Shoe Manufacturer in China

