 Eng
Eng  中文简体
中文简体 Home / News / Industry News / Brake Shoe Repair Kits: What's Included, When You Need One, and How to Do the Job Right
 Brake Shoe Repair Kits: What's Included, When You Need One, and How to Do the Job Right
 2026.03.25
 Industry News
Content
- 1 What Is a Brake Shoe Repair Kit and What Does It Contain?
- 2 Components Inside a Complete Drum Brake Shoe Kit
- 3 Signs That Your Vehicle Needs a Brake Shoe Repair Kit
- 4
- 5 Brake Shoe Repair Kit Types and How to Choose the Right One
- 6 Step-by-Step Brake Shoe Replacement Using a Repair Kit
- 7 Common Mistakes to Avoid When Using a Brake Shoe Repair Kit
- 8 Top Brake Shoe Repair Kit Brands and What Sets Them Apart
What Is a Brake Shoe Repair Kit and What Does It Contain?
A brake shoe repair kit is a comprehensive collection of components designed to restore the full function of a drum brake assembly without requiring the purchase of individual parts from multiple sources. Rather than replacing only the worn brake shoes themselves, a complete brake shoe repair kit includes all the small but critical hardware items that wear, corrode, or fatigue alongside the shoes over time — ensuring the entire drum brake system is rebuilt to factory specification in a single service event. This approach eliminates the common mistake of installing new brake shoes on degraded hardware, which leads to uneven shoe return, dragging brakes, premature lining wear, and noise complaints shortly after the repair.
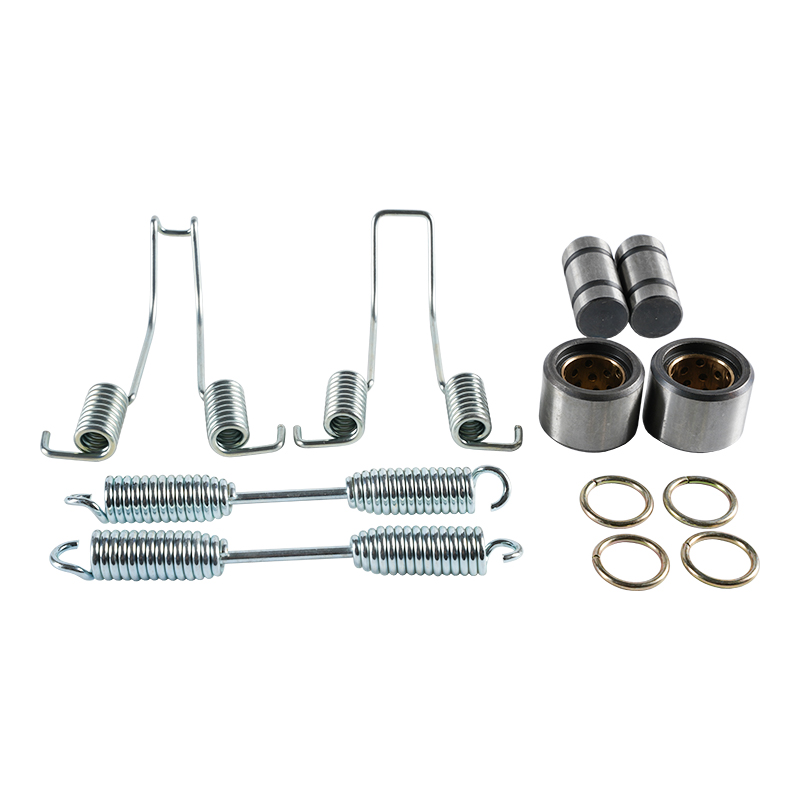
The exact contents of a drum brake shoe repair kit vary by vehicle application and manufacturer, but a fully equipped kit for a typical passenger vehicle or light truck drum brake assembly generally includes brake shoes with pre-attached or separate friction linings, a set of return springs (primary and secondary), hold-down springs and pins, an adjuster assembly (star wheel adjuster or automatic self-adjuster mechanism), adjuster lever and pivot, parking brake strut and spring, wheel cylinder cups or a complete wheel cylinder rebuild kit, and any application-specific retaining clips or wave washers. Premium brake shoe hardware kits from suppliers such as Raybestos, ACDelco, Dorman, and Wagner include all hardware items needed for a complete drum brake overhaul on both rear wheels, recognizing that drum brake service should always be performed as an axle pair.
Components Inside a Complete Drum Brake Shoe Kit
Understanding what each component in a brake shoe rebuild kit does helps technicians and DIY mechanics verify kit completeness before starting the job and understand why each part matters to overall brake performance and safety. Skipping any of these components during reassembly is a false economy that invariably leads to a repeat repair sooner than necessary.
Brake Shoes and Friction Linings
The brake shoes themselves are curved steel platforms that carry the friction lining material against the inner drum surface when the brakes are applied. Modern brake shoe repair kits include shoes with pre-bonded or pre-riveted friction linings made from non-asbestos organic (NAO), semi-metallic, or ceramic compound formulations matched to the vehicle's original equipment specification. The friction material compound determines stopping power, fade resistance, noise characteristics, and dust generation. Semi-metallic linings offer strong heat dissipation and high-temperature performance suitable for trucks and towing applications, while NAO and ceramic compounds provide quieter operation and reduced rotor wear for passenger cars and light SUVs. Brake shoes in a repair kit are always sold as a matched axle set — four shoes for a single axle — because unmatched friction coefficients between left and right drum brakes cause brake pull and uneven deceleration.
Return Springs
Brake shoe return springs retract the shoes away from the drum surface immediately after brake pedal release, preventing brake drag, heat buildup, and premature lining wear. A typical drum brake assembly uses two return springs per wheel — a primary (front) spring and a secondary (rear) spring — with different tension ratings matched to their respective shoe positions. These springs are among the most frequently neglected components in drum brake service. After years of heat cycling and corrosion exposure, spring tension degrades significantly below its original specification, resulting in slow shoe retraction, residual drag, and a low or spongy brake pedal feel. A quality brake shoe spring kit always includes color-coded springs matched to the exact tension specification for the application, making correct identification and installation straightforward even without specialized spring tension measurement tools.
Hold-Down Springs and Pins
Hold-down springs and their associated anchor pins secure each brake shoe to the backing plate while allowing the shoe to move radially outward when the brakes are applied. This hardware must maintain consistent clamping force against the backing plate throughout the brake application cycle — insufficient hold-down force allows the shoe to vibrate and chatter, generating brake squeal and uneven lining contact patterns. The hold-down pins pass through holes in both the brake shoe web and the backing plate, retained by the coiled hold-down spring and a retaining cup that locks with a quarter-turn. These components corrode and weaken with age and should always be replaced as part of any brake shoe hardware kit installation.
Adjuster Assembly and Self-Adjuster Components
The adjuster assembly — commonly called the star wheel adjuster — maintains the correct running clearance between the brake shoes and drum as friction lining material wears down over time. A properly functioning adjuster ensures consistent pedal height and braking response throughout the service life of the brake linings. Most modern vehicles use an automatic self-adjusting mechanism triggered by reverse braking or parking brake application that incrementally advances the star wheel as lining wear increases. Adjuster assemblies are threaded components with left and right-hand thread versions that are not interchangeable between sides — a detail that brake shoe repair kit contents must address with clearly labeled left and right adjuster assemblies. Corroded or seized adjusters that cannot thread freely are a leading cause of vehicles requiring brake adjustment shortly after a brake shoe replacement, and should always be replaced rather than cleaned and reused.
Parking Brake Strut and Cable Hardware
The parking brake strut is a rigid link between the primary and secondary brake shoes that transmits parking brake cable force to spread both shoes against the drum when the parking brake is engaged. The strut is accompanied by a small anti-rattle spring that prevents vibration noise during driving. Parking brake cable end clips, adjuster nuts, and cable guides included in comprehensive brake shoe repair hardware kits ensure the parking brake circuit is fully reconditioned during the drum brake service, eliminating the common problem of a properly adjusted service brake coexisting with a soft or ineffective parking brake due to worn cable hardware.
Signs That Your Vehicle Needs a Brake Shoe Repair Kit
Recognizing the warning signs of worn drum brake components early allows a controlled repair before degraded braking performance or component failure creates a safety hazard. Several distinct symptoms indicate it is time to inspect the drum brake assembly and assess whether a brake shoe hardware kit replacement is warranted.
- Scraping or Grinding Noise When Braking: A metallic scraping or grinding sound during brake application indicates the friction lining has worn down to the steel shoe platform, which is now making direct contact with the brake drum. This is the most urgent warning sign requiring immediate inspection, as continued operation in this condition rapidly grooves the drum surface and may render it non-resurfaceable, adding drum replacement to the repair cost.
- Squealing or High-Pitched Brake Noise: Persistent squealing from the rear brakes during normal braking — distinct from the occasional squeal heard when backing up, which is normal in many drum brake designs — indicates glazed friction linings, weak hold-down springs allowing shoe vibration, or contamination of the lining surface from wheel cylinder leakage.
- Vehicle Pulling to One Side During Braking: Brake pull toward one side indicates an imbalance between the left and right rear drum brake assemblies — most commonly caused by a wheel cylinder leaking brake fluid onto one side's friction lining, a seized adjuster on one side causing unequal shoe-to-drum clearance, or a broken return spring on one side preventing proper shoe retraction.
- Low or Soft Brake Pedal: A brake pedal that travels excessively before firm resistance is felt, or a pedal that slowly sinks toward the floor under steady pressure, indicates air in the hydraulic system or a failing wheel cylinder — both conditions that a complete drum brake shoe kit including wheel cylinder rebuild components addresses directly.
- Brake Drag and Reduced Fuel Economy: A vehicle that requires noticeably more throttle than usual, or that decelerates when the accelerator is released more than expected, may have dragging drum brakes caused by weak return springs that are not fully retracting the shoes from the drum surface.
- Ineffective Parking Brake: A parking brake lever or pedal that must be applied to its full travel to hold the vehicle on a moderate incline, or that fails to hold reliably on steeper grades, indicates worn brake shoe linings, a failed automatic adjuster, or stretched parking brake cable hardware — all conditions addressed within a comprehensive brake shoe repair kit.
Brake Shoe Repair Kit Types and How to Choose the Right One
Brake shoe repair kits are available at several levels of completeness, from basic hardware-only kits that assume the existing shoes are serviceable, to full drum brake rebuild kits that include everything needed to return a high-mileage drum brake assembly to like-new condition. Selecting the appropriate kit level depends on the current condition of the existing components and the maintenance philosophy of the vehicle owner or shop.
| Kit Type | Contents | Best For | Typical Price Range |
| Hardware Kit Only | Springs, pins, adjuster, strut hardware | Shoe replacement with serviceable drums | $8–$25 per axle |
| Brake Shoe and Hardware Kit | Shoes + full hardware set | Standard brake service at wear limit | $35–$90 per axle |
| Complete Drum Brake Rebuild Kit | Shoes + hardware + wheel cylinder rebuild | High-mileage vehicles, full restoration | $55–$130 per axle |
| Drum Brake Kit with Drums | Shoes + hardware + new brake drums | Scored or worn-beyond-spec drums | $90–$200 per axle |
For vehicles with more than 60,000 miles on the original drum brake hardware, or any vehicle where the brake fluid shows signs of contamination or the wheel cylinder boots show cracking or leakage, the complete drum brake rebuild kit is the most cost-effective choice. The incremental cost of the additional components is small relative to the total labor investment, and performing a complete rebuild eliminates the risk of a follow-up repair within the next service interval due to a failed component that was not replaced during the initial job.
Step-by-Step Brake Shoe Replacement Using a Repair Kit
Installing a brake shoe repair kit correctly requires careful attention to component orientation, spring placement, and adjuster setup. Drum brake assemblies vary in design between manufacturers, and taking reference photographs before disassembly is strongly recommended to guide correct reassembly — particularly for the spring attachment points and adjuster lever orientation, which are easy to misplace without a visual reference.
Preparation and Safety
Safely raise and support the vehicle on jack stands rated for its weight, with the parking brake released. Remove the wheel and tire assembly. Before removing the brake drum, spray the drum-to-hub contact surface and lug nut area with penetrating oil if corrosion bonding is suspected. Use a drum puller if the drum does not release with hand pressure and light hammer taps — forcing a stuck drum can damage the wheel bearing or backing plate. With the drum removed, use a digital caliper to measure drum inside diameter at multiple points and compare to the maximum diameter specification stamped on the drum exterior; drums worn or scored beyond this limit must be replaced rather than reused with new shoes.
Disassembly and Documentation
Before removing any components, photograph the entire drum brake assembly from multiple angles, paying particular attention to the adjuster mechanism orientation, the color and attachment point of each spring, and the routing of the parking brake cable. Use brake spring pliers — a specialized tool designed to safely compress and release the high-tension return springs — to remove the primary and secondary return springs from their anchor posts. Compress and rotate the hold-down spring retainers to release the hold-down pins, then remove both brake shoes as a unit along with the adjuster assembly and parking brake strut. Inspect the wheel cylinder for leakage by carefully peeling back the rubber dust boots at each end — any brake fluid moisture or wet residue behind the boot confirms the wheel cylinder requires rebuilding or replacement.
Cleaning and Backing Plate Preparation
With all components removed, clean the backing plate thoroughly using brake cleaner spray to remove brake dust, grease, and corrosion deposits. Wire brush the raised shoe contact pads on the backing plate — the six to eight raised platforms on which the brake shoe webs slide during application — until they are clean bare metal, then apply a thin film of high-temperature brake lubricant or anti-seize compound to these contact points only. Do not apply lubricant to the friction lining contact area of the drum or any surface that contacts the friction material — lubricant contamination of brake linings requires immediate replacement of the affected shoes and thorough drum cleaning before the system is safe to use.
Installation of New Kit Components
Assemble the new adjuster star wheel from the repair kit, ensuring left-hand and right-hand threaded assemblies are correctly assigned to their respective sides — the adjuster must thread outward (expanding) when the star wheel is rotated in the self-adjustment direction for that wheel. Connect the new parking brake strut and its anti-rattle spring between the two new brake shoes before installing them on the backing plate as a pre-assembled unit. Install the new hold-down pins through the backing plate and shoes, compress and lock the new hold-down springs. Use the brake spring pliers to install the new primary and secondary return springs at their correct anchor points as documented in your pre-disassembly photographs. Verify the adjuster lever contacts the star wheel correctly and that it moves freely through its full range of adjustment travel.
Drum Installation and Initial Adjustment
Before installing the drum, manually adjust the star wheel adjuster until the shoes are expanded to a diameter approximately 1–2 mm smaller than the drum inside diameter — this is achieved by counting adjuster clicks or using a drum brake gauge tool to measure shoe-set diameter directly. Install the drum over the shoes; it should slide on with light resistance but without binding. Install the wheel and lug nuts finger-tight, then lower the vehicle to the ground and torque the lug nuts to specification. Pump the brake pedal firmly 10–15 times to seat the new shoes against the drum surface and allow the automatic adjuster to take up any remaining clearance. Test parking brake function and adjust the cable if necessary before moving the vehicle.
Common Mistakes to Avoid When Using a Brake Shoe Repair Kit
Even experienced mechanics occasionally make errors during drum brake service that result in noise, poor performance, or repeat repairs. Being aware of these common mistakes before starting the job prevents the frustration of a comeback repair and ensures the brake shoe repair kit installation delivers the full service life it is designed to provide.
- Reusing Old Springs: Return springs that appear visually intact have frequently lost 20–40% of their original tension after years of heat cycling. Installing new shoes with old springs results in brake drag, slow pedal return, and premature lining wear. Always install all springs from the brake shoe hardware kit regardless of the apparent condition of the originals.
- Mixing Left and Right Adjuster Assemblies: Installing the left-side adjuster on the right wheel (or vice versa) reverses the self-adjustment direction, causing the adjuster to back off rather than advance as lining wears. This results in progressively increasing pedal travel and eventual brake failure on that corner. Always verify thread hand orientation before installation.
- Contaminating Friction Linings with Lubricant: Applying too much brake lubricant to the backing plate shoe contact pads, or lubricating the wrong surfaces, risks contaminating the new friction linings. Contaminated linings cannot be cleaned — they must be replaced immediately as they will cause severe brake pull and reduced stopping power.
- Skipping Drum Measurement: Installing new shoes in a drum worn beyond its maximum inside diameter specification allows the shoes to flex excessively under braking load, causing rapid lining wear, heat buildup, and inconsistent brake feel. Always measure drum diameter and compare to the specification before reuse.
- Servicing Only One Side: Drum brake components on both rear wheels wear at approximately the same rate because they experience identical loading. Servicing only the side that triggered the complaint and leaving the other side's worn components in place guarantees a repeat repair within a short time, and creates the brake pull and imbalance problems that make the vehicle unsafe during braking.
- Failing to Bed in New Brake Shoes: New friction linings require a controlled bedding procedure — a series of moderate brake applications from 30 mph down to 5 mph with cooling intervals between stops — to transfer a thin uniform layer of friction material onto the drum surface and thermally condition the lining compound. Skipping the bedding process leads to reduced initial braking effectiveness and can cause premature glazing of the new lining surface.
Top Brake Shoe Repair Kit Brands and What Sets Them Apart
The quality of components included in a brake shoe hardware kit varies significantly between brands, and selecting a reputable supplier directly impacts how long the repair lasts and how well the brakes perform after installation. The following overview covers the most widely available and trusted brands in the drum brake repair kit segment.
Raybestos
Raybestos is one of the longest-established brake component suppliers in North America, offering both brake shoe and hardware kits under their Professional Grade and Element3 lines. Raybestos drum brake shoe kits are known for complete hardware inclusion, accurate application fitment across a wide vehicle coverage database, and friction compounds engineered to match OEM stopping distance and fade resistance specifications. Their brake shoe spring kits use pre-tested springs with tension ratings verified against original equipment specifications, making them a preferred choice for professional repair facilities performing high-volume brake work.
ACDelco
ACDelco's drum brake shoe repair kits are the OEM-equivalent choice for General Motors vehicles, with direct-fit components manufactured to the same dimensional specifications as factory-installed parts. ACDelco offers both their Advantage (value) and Professional (OEM-equivalent) tier brake shoe kits, with the Professional series including premium bonded linings, complete hardware, and application-specific adjuster assemblies. For GM truck and SUV owners performing rear drum brake service, ACDelco Professional kits represent the closest available match to original factory specifications.
Dorman and Wagner
Dorman's drum brake hardware kits are widely available through major retail and online auto parts channels and offer strong value at competitive price points. Their hardware-only kits are particularly comprehensive, often including components that economy-tier competitors omit. Wagner's ThermoQuiet brake shoe line focuses on noise reduction through their proprietary friction compound formulations and integrally molded insulators, making Wagner brake shoe kits a strong choice for passenger vehicles where brake noise minimization is a priority alongside stopping performance.


Copyright © Zhejiang Langrun Auto Parts Co., Ltd. All rights reserved. Heavy-Duty Brake Shoe Manufacturer in China

