 Eng
Eng  中文简体
中文简体 Home / News / Industry News / The 4707 Brake Shoe Explained: Specs, Fitment, and How to Replace It Right
 The 4707 Brake Shoe Explained: Specs, Fitment, and How to Replace It Right
 2026.06.10
 Industry News
Content
- 1 What the 4707 Brake Shoe Is and Where It Fits
- 2 4707 Brake Shoe Specifications at a Glance
- 3 4707 Brake Shoe Cross-Reference and Compatible Part Numbers
- 4 Vehicle and Axle Fitment for the 4707Q Brake Shoe
- 5 Understanding 4707 Brake Shoe Lining Grades
- 6 Signs That Your 4707 Brake Shoes Need Replacement
- 7 How to Replace 4707 Brake Shoes: A Practical Walkthrough
- 8 New vs. Remanufactured 4707 Brake Shoes — Which Should You Buy?
- 9 Maintenance Tips to Maximize 4707 Brake Shoe Life
What the 4707 Brake Shoe Is and Where It Fits
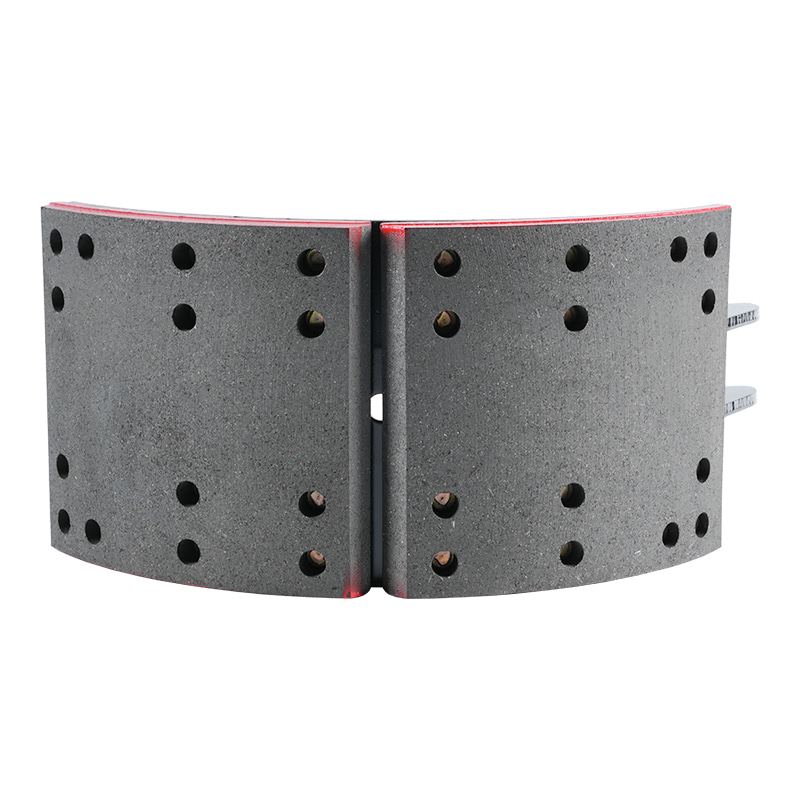
The 4707 brake shoe — formally designated FMSI 4707 — is one of the most widely used drum brake shoe specifications in the North American heavy-duty trucking industry. It is designed for the Meritor Q-Plus (Q+) S-cam drum brake system, which is the dominant brake platform on Class 6 through Class 8 commercial trucks, semi-trailers, and heavy-duty trailers across the United States and Canada. The shoe carries a standard size of 16-1/2 inches in diameter and 7 inches in width, and it is rated for a gross axle weight rating (GAWR) of 23,000 lbs in its standard 23K configuration — making it suitable for drive and trailer axles on fully loaded commercial vehicles.
Unlike passenger car drum brakes, which use a wheel cylinder and hydraulic pressure to push the shoes outward, the 4707 Q-Plus brake shoe system is air-actuated. A rotating S-cam — driven by an air brake chamber and slack adjuster — pushes against rollers mounted on the brake shoe ends, forcing the shoes outward against the inside surface of the brake drum to create friction and slow the vehicle. The Q-Plus designation refers to Meritor's improved generation of this S-cam design, which features enhanced geometry for more consistent brake force application across the shoe width.
4707 Brake Shoe Specifications at a Glance
When ordering or cross-referencing a 4707 brake shoe kit, these are the key specifications to confirm before purchasing. Fitting the wrong shoe size or lining grade to an axle can compromise braking performance and potentially put a vehicle out of compliance with FMVSS 121 brake standards.
| Specification | Detail |
| FMSI Number | 4707 / 4707Q / 4707QP |
| Brake Drum Diameter | 16-1/2" (16.5 inches) |
| Brake Shoe Width | 7 inches |
| Brake System | Meritor Q-Plus (Q+) S-Cam |
| Axle Weight Rating (Standard) | 23,000 lbs GAWR |
| Axle Weight Rating (Premium) | 20,000 lbs GAWR (premium lining grade) |
| Brake Type | S-Cam Drum (Air Brake) |
| Lining Standard (Post-2012 Trucks) | RSD-certified friction required (e.g., XK312, Bendix RSD) |
| FMVSS Certification | FMVSS 121 (air brake systems) |
| Standard Kit Contents | 2 lined shoes, return spring, hold-down springs, anchor pins, rollers, retainer clips |
One detail that catches some buyers off guard: trucks built after August 2011 are subject to the FMCSA's Reduced Stopping Distance (RSD) mandate, which requires higher-performance friction materials. If your commercial vehicle falls into this post-2012 category, a standard 23K lining may not provide sufficient stopping performance and can cause accelerated wear. Confirm your build date and required friction grade before ordering replacement 4707 brake shoes.
4707 Brake Shoe Cross-Reference and Compatible Part Numbers
The 4707 brake shoe is manufactured by multiple OEM and aftermarket suppliers under a wide range of part numbers. If you're sourcing replacements for a fleet or shopping across multiple distributors, knowing the cross-reference numbers saves time and prevents ordering errors. The following are commonly used equivalent part numbers across major brands:
- Meritor / Rockwell: 4707Q, 4707QP, 4707Q.23, E-2761Q
- Haldex: GF4707QN, GD4707QG, 4707-Q-NB225, GG4707QG
- Bendix: BEN-KT4707QBA232R, GBEK4707Q20PR, GBEK4707QMHS, GBNK4707QSBP20
- TRP (PACCAR): RK4707QPR23M, SUP4707QKIT
- Toolots / Generic Cross-Reference: E5503, R4707, 4707R, 4707XT, 4707D, M3189, 21855
- FleetPro Aftermarket: 4707Q.23, XK5204707QP, 8235XKEG24707QP, S 312-4707QP
Always verify that the cross-reference you're using matches not just the shoe shell geometry but also the lining grade required for your axle weight rating and model year. A shoe table stamped 4707 can carry different linings — standard 23K organic, premium 20K, or RSD-certified friction — and these are not interchangeable on the basis of part number alone. When in doubt, confirm the FMSI number, shoe size, and lining grade with your parts supplier before committing to an order.
Vehicle and Axle Fitment for the 4707Q Brake Shoe
The 4707Q brake shoe is used on a broad range of heavy-duty commercial vehicles equipped with Meritor Q-Plus or compatible Q-style drum brake systems. It is found primarily on drive axles and trailer axles across the following platform categories:
- Class 8 semi-trucks: Kenworth T680, T880, W900; Peterbilt 579, 389, 567; Freightliner Cascadia and Classic; International LT and ProStar; Volvo VNL; Mack Anthem and Pinnacle — all commonly equipped with Meritor Q-Plus rear drive axles using the 4707 shoe.
- Flatbed, dry van, and refrigerated trailers: Most standard 53-foot trailers running on Meritor or compatible axles use the 4707Q shoe on all trailer axle positions.
- Class 6–7 vocational trucks: Dump trucks, refuse trucks, concrete mixers, and other severe-duty vocational vehicles running Rockwell/Meritor rear axles often specify the 4707 shoe for their rear axle positions.
- Tandem and tridem trailer axles: Drop-deck, lowboy, and step-deck trailers with Meritor-compatible axles use the 4707Q shoe on all axle positions where the 16.5" x 7" drum specification applies.
To confirm fitment for a specific vehicle, check the axle tag mounted on the axle housing — it will list the axle model number, GAWR, and brake size. Alternatively, reference the vehicle's brake certification label (typically found on the driver's door jamb or in the OEM service manual), which will specify the required shoe FMSI number and lining grade by axle position.
Understanding 4707 Brake Shoe Lining Grades
The brake shoe shell — the stamped steel arc that forms the structural body of the shoe — is the same across most 4707-specification parts. What differs significantly between product tiers is the friction lining material bonded or riveted to the shoe table. Choosing the right lining grade is critical for both safety compliance and getting the service life you're paying for.
| Lining Grade | Common Designation | Axle Rating | RSD Compliant | Best Application |
| Standard 23K Organic (NAO) | NS302, 23K Standard | 23,000 lbs | No | Pre-2012 trucks, trailers |
| Premium 20K | FF Grade, Premium | 20,000 lbs | Varies | Drive axles, mixed service |
| RSD / XK312 | Meritor XK312, Bendix RSD | 23,000 lbs | Yes | Post-2012 trucks (required) |
| Severe Duty / Long Haul | Varies by brand | 23,000 lbs | Yes (most) | High-mileage OTR, mountain routes |
Non-asbestos organic (NAO) friction materials now make up the majority of 4707 brake shoe lining production, replacing the asbestos-based linings used decades ago. Modern NAO linings provide comparable friction performance with significantly reduced health risk during handling and brake dust exposure. Some fleets operating in extreme mountain or heavy haul conditions opt for semi-metallic lining compounds, which offer better heat dissipation at the cost of slightly higher drum wear rates.
Signs That Your 4707 Brake Shoes Need Replacement
Heavy-duty brake shoe wear doesn't always announce itself loudly, especially on trucks that operate under consistent load conditions where drivers become accustomed to gradual changes in brake feel. Knowing the specific warning signs — and acting on them before the lining wears completely through — is essential for both safety and avoiding drum damage that multiplies repair costs.
- Lining thickness below 1/4 inch: The standard replacement threshold for heavy-duty truck brake shoe lining is approximately 1/4 inch (6.35mm) of remaining material. At this point, braking efficiency drops noticeably and the risk of the lining wearing through to the rivet heads increases. Inspect lining thickness through the drum inspection port at every scheduled PM interval.
- Squealing or metal-on-metal grinding: A high-pitched squeal during brake application indicates the lining is approaching its wear limit. A deep grinding sound means metal-on-metal contact has already begun — the shoe table is contacting the drum directly, causing drum scoring that will require drum replacement as well.
- Vehicle pulling to one side under braking: Uneven lining wear between the left and right shoes on the same axle creates an imbalance in braking force, causing the vehicle to pull toward the side with more remaining friction material. This can also indicate a seized slack adjuster or sticking cam on one side.
- Reduced stopping distance performance: If the vehicle is taking noticeably longer to stop from highway speeds, or air brake application pressure must be increased to achieve the same deceleration, lining wear or glazing is a likely contributor. Glazed linings — caused by overheating from dragging brakes or improper break-in — have a hard, shiny surface with significantly reduced friction coefficient.
- Visible cracking or delamination of the lining: A direct visual inspection through the drum inspection port that reveals cracked, chunked, or partially detached friction material requires immediate shoe replacement, regardless of remaining lining thickness.
- Excessive brake dust accumulation: While some brake dust is normal, an unusual volume of dust around one wheel end compared to others often indicates that one shoe set is wearing faster than normal — typically due to a seized automatic slack adjuster keeping that brake partially applied.
How to Replace 4707 Brake Shoes: A Practical Walkthrough
Replacing 4707Q brake shoes on a Meritor Q-Plus system is a straightforward job for a technician familiar with heavy-duty drum brakes. The key is working systematically, replacing all hardware in the kit, and verifying brake adjustment before returning the vehicle to service. Here is a practical overview of the process.
Tools and Parts Required
- Complete 4707Q brake shoe kit (2 lined shoes, return spring, hold-down springs, anchor pins, rollers, retainer clips)
- Heavy-duty floor jack and axle stands rated for the vehicle's axle weight
- Air or electric impact wrench with appropriate sockets (lug nuts on commercial wheels are typically 33mm)
- Drum puller or slide hammer (if drums are corroded onto the hub)
- Spring removal and installation tools (brake spring pliers rated for heavy-duty springs)
- Wire brush and brake cleaner for cleaning the brake spider and cam components
- High-temperature brake cam lubricant (for S-cam bushings, anchor pins, and roller contact points)
- Drum micrometer (to measure drum diameter and confirm it's within discard limits)
Step-by-Step Replacement Process
Begin by chocking the wheels on the opposite axle and safely releasing the spring brake chambers — never work under a vehicle or near wheel ends with spring brakes applied and no physical chocks. Loosen the lug nuts before jacking, then raise and support the axle on stands. Remove the wheel and tire assembly. If the brake drum is reluctant to come off due to rust or lining contact, back off the automatic slack adjuster by rotating the adjustment hex counterclockwise several turns to retract the shoes before attempting removal.
With the drum removed, measure its inside diameter with a drum micrometer. The maximum discard diameter for a standard 16.5" drum is typically 16.620 inches — drums worn or scored beyond this dimension must be replaced, not reused with new shoes. Clean the entire brake spider, anchor pin boss, cam head, and all contact surfaces with brake cleaner and a wire brush. Remove the return spring first, then the hold-down springs and anchor pins to free the old shoes. Discard all springs and hardware — never reuse hardware from the old kit, as fatigued springs contribute to uneven shoe return and premature wear.
Apply a thin coat of high-temperature brake cam grease to the S-cam head contact points, the anchor pin bosses, and the roller contact areas on the new shoes — but keep lubricant strictly away from the lining surface and drum interior. Install the new shoes with the new anchor pins and rollers, reconnect the hold-down springs, then install the return spring. Reinstall the drum, torque the wheel nuts to specification (typically 450–500 ft-lb for standard commercial wheel studs), and adjust the slack adjuster to bring the shoes into proper running clearance. Apply the brakes several times from the cab to seat the shoes and verify the automatic slack adjuster is cycling correctly before moving the vehicle.
New vs. Remanufactured 4707 Brake Shoes — Which Should You Buy?
The 4707 brake shoe market offers both brand-new lined shoes and remanufactured (reman) units, where a used shoe table is reconditioned and fitted with new friction lining. Both options are viable, but the right choice depends on your fleet's priorities and budget.
Remanufactured 4707 brake shoes from reputable suppliers — such as TRP's reman program, which presses shoes in a 1,000-ton press to restore OEM tolerances — can offer genuine value and performance equivalent to new, particularly when the core shoe table is in good condition. The advantage is typically a lower per-unit cost, and USA-manufactured reman shoes from established suppliers carry FMVSS 121 certification and competitive warranty terms. However, reman shoes require a core return, and the quality varies significantly between suppliers — a poorly reconditioned shoe table with worn anchor pin recesses or distorted shoe webs will cause premature lining wear and noisy brake operation regardless of the new lining applied to it.
New 4707 brake shoes eliminate core concerns and provide a known-condition shoe table with fresh geometry. For fleets operating under severe duty conditions — mountain routes, oversize loads, frequent stop-and-go urban delivery — new shoes from a Tier 1 supplier (Meritor, Haldex, Bendix) provide the most predictable performance baseline. The price premium over reman is modest at the individual shoe level, and in high-mileage or hard-use applications it is generally worth it. For standard OTR trailer axles on flat routes with moderate mileage, quality reman shoes with RSD-certified lining are a practical and cost-effective choice.
Maintenance Tips to Maximize 4707 Brake Shoe Life
Getting the most miles from a set of 4707 brake shoes comes down to consistent inspection, keeping the surrounding components in good condition, and catching wear issues before they cascade into more expensive damage. These practical habits make a measurable difference in lining service life and brake system reliability across a fleet.
- Inspect at every PM interval: Check lining thickness, look for cracking or delamination, and verify shoe-to-drum clearance at every scheduled preventive maintenance service. Catching a shoe at 3/8-inch lining is far less costly than finding it at metal-to-metal contact.
- Keep automatic slack adjusters functioning correctly: A slack adjuster that is not maintaining proper push rod stroke causes the brake to either drag — overheating and glazing the lining — or under-apply — reducing braking force and causing the remaining shoes to work harder. Verify slack adjuster free stroke is within FMCSA limits (typically 5/8 to 3/4 inch) at every brake inspection.
- Inspect and replace drums at the wear limit: Running new 4707 brake shoes against a scored, out-of-round, or oversize drum causes the new lining to wear unevenly and reach replacement threshold far sooner than it should. Always measure drum diameter when installing new shoes and replace drums that are at or beyond the discard dimension.
- Replace all hardware with every shoe change: The springs, anchor pins, and rollers included in the 4707Q kit are not optional extras — fatigued return springs cause slow shoe retraction, which results in dragging brakes and rapid lining wear. Always install the complete hardware kit with every shoe replacement.
- Perform a proper brake burnish after installation: New 4707 brake shoes require a break-in procedure to seat the lining surface against the drum and develop full friction potential. A standard burnish involves a series of moderate stops from approximately 30 mph, allowing the brakes to cool between applications, repeated 10–15 times before the vehicle enters normal service.


Copyright © Zhejiang Langrun Auto Parts Co., Ltd. All rights reserved. Heavy-Duty Brake Shoe Manufacturer in China

